Visual Studio 2017 not returning to correct line after ctrl click (go to definition) and closing window

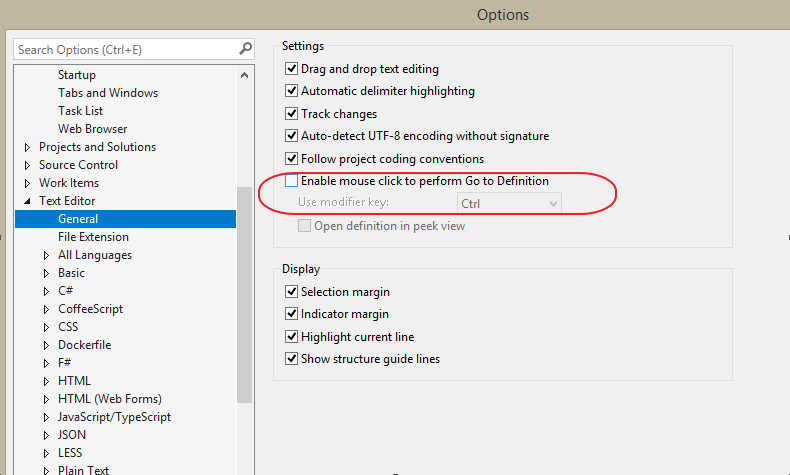
For me the problem was connected to ReSharper which already implements this function. Solution was to disable the VS 2017 functionality for ctrl+click. (prefer the ReSharper way with built in decompiling)

Goto options -> Text Editor -> General -> uncheck “Enable mouse click…”

Disable the default vs2017 setting.

‘fatal: unable to access ‘\/.config/git/config’: Invalid argument’ when running VS 2017 and opening a GIT based solution

I got this messageĀ ‘fatal: unable to access ‘\/.config/git/config’: Invalid argument’ when opening a GIT based solution in VS 2017.
Solution was to add an environment variable “HOME” with value “c:\” (c: or where your project folder resides).

Solution info here:

Source: I get ‘fatal: unable to access ‘\/.config/git/config’: Invalid argument’ when running VS 2017 as a user on a different domain from local windows user – Developer Community

How to solve Selenium error Element is not clickable at point (x, y) Other element would receive the click

The error message looks like this:

System.InvalidOperationException : unknown error: Element <... (html) ...> is not clickable at point (x, y). Other element would receive the click: <...(html)...>

Stack trace
at OpenQA.Selenium.Remote.RemoteWebDriver.UnpackAndThrowOnError(Response errorResponse)
at OpenQA.Selenium.Remote.RemoteWebDriver.Execute(String driverCommandToExecute, Dictionary`2 parameters)
at OpenQA.Selenium.Remote.RemoteWebElement.Click()

Solution:
The clickable element is not ready, it might not be visible or clickable.
Sometimes the element is covered by another html element. (hide the covering element first).

Steps:
1. Wait for element to be visible
2. Wait for element to be clickable
3. Click with javascript

If this still this doesn’t work insert an implicit wait between step 1 and 2. (Thread.Sleep() in c#)

C# driver code to solve problems:
Wait for element to be visible and clickable (ElementToBeClickable = element is visible AND enabled.)

        public IWebElement WaitUntilElementIsClickable(By findElementsBy)
        {
            var wait = new WebDriverWait(driver, timeoutForElementShouldBeVisibleInSeconds);

            try
            {
                var element = wait.Until(ExpectedConditions.ElementToBeClickable(findElementsBy));
                return element;
            }
            catch (Exception exception)
            {
                string message = exception.Message + " at findElementsBy " + findElementsBy.ToString();
                Exception customException = new Exception(message, exception);
                throw customException;
            }
        }        public IWebElement WaitUntilElementIsClickable(By findElementsBy)
        {
            var wait = new WebDriverWait(driver, timeoutForElementShouldBeVisibleInSeconds);

            try
            {
                var element = wait.Until(ExpectedConditions.ElementToBeClickable(findElementsBy));
                return element;
            }
            catch (Exception exception)
            {
                string message = exception.Message + " at findElementsBy " + findElementsBy.ToString();
                Exception customException = new Exception(message, exception);
                throw customException;
            }
        }

Click with javascript:

        public void ClickOnElement(string cssElementSelector)
        {
            string js = $"document.querySelector(\"{cssElementSelector}\").click()";
            ExecuteJavascript(js);
        }
		
		        public string ExecuteJavascript(string script)
        {
            return ExecuteJavascript<string>(script);
        }

        /// <summary>
        /// Executes JavaScript in the context of the currently selected frame or window.
        /// </summary>
        /// <typeparam name="T">The converted return type</typeparam>
        /// <param name="script">The JavaScript code to execute.</param>
        /// <param name="args">The arguments to the script.</param>
        /// <returns></returns>
        public T ExecuteJavascript<T>(string script, object[] args = null)
        {
            IJavaScriptExecutor javaScriptExecutor = uiTests.Driver as IJavaScriptExecutor;
            object result = null;

            var wait = new WebDriverWait(uiTests.Driver, timeout: TimeSpan.FromMinutes(3));
            wait.Until(ExpectedConditions.ElementIsVisible(By.TagName("body")));

            result = javaScriptExecutor.ExecuteScript(script, args);
            T typedResult = (T) result;
            return typedResult;
        }
 

Read and understand code faster with programming ligatures in Fira Code font | Making Visual Studio perfect

I was recently on a conference and spotted this nice code font:
Fira Code
which makes use of “ligatures” that takes common programming characters and make them more readable.

Such as >= ++ != and presents them in a more condensed and more readable way.

Read more here:
Read and understand code faster with programming ligatures in Fira Code font | Making Visual Studio perfect

To use in Visual Studio 2017, download from:
https://github.com/tonsky/FiraCode/releases/download/1.204/FiraCode_1.204.zip

Unzip ttf folder select all fonts, right click menu and install.
Open/Restart VS2017 -> Options -> Environment -> Fonts and colors -> Select “Fira Code” as font.

Fira Code on github:
https://github.com/tonsky/FiraCode

Scott Hanselman onĀ Monospaced Programming Fonts with Ligatures:
https://www.hanselman.com/blog/MonospacedProgrammingFontsWithLigatures.aspx

See more code in VS2017 – Shrink Empty Lines Addon

Use this addon for VS 2017:

Source: Shrink Empty Lines – Visual Studio Marketplace

Shrinks empty line height in code editor by 25% to be able to see more lines of codes at a glance.

Read more:
https://visualstudioextensions.vlasovstudio.com/2014/06/04/see-more-lines-of-code-with-syntactic-line-compression/

Attach To All The Things – Visual Studio 2017 Addon

Great tool for attaching VS 2017 debug to IIS for instance.

It will add some menu options under the Tools menu.
After installing this addon its possible set a keyboard shortcut by searching for “tools.attach” in the VS keyboard shortcut window.

Source: Attach To All The Things – Visual Studio Marketplace

Elasticsearch for .NET and EPiServer developers

Ealasticsearch Tutorial:
https://www.toptal.com/dot-net/elasticsearch-dot-net-developers

Vulcan is an EPiServer lightweight (free) alternative to EPiServer find, based on Elasticsearch as well:
https://world.episerver.com/blogs/Dan-Matthews/Dates/2016/4/introducing-vulcan-the-lightweight-elasticsearch-client-for-episerver/

https://world.episerver.com/blogs/Dan-Matthews/Dates/2017/1/vulcan-comes-of-age/

Creating EPiServer admin tool plugins using MVC

Creating the tool:
EPiServer – How to create gui plugins using MVC – Dejan Caric
I had to configure the route initialization like this to make it work:

        public void Initialize(InitializationEngine context)
        {
            //ContentLanguagePlugin
            RouteTable.Routes.MapRoute("ContentLanguagePlugin", "admin-tools/content-language-plugin/{action}/{id}",
                new
                {
                    controller = "ContentLanguagePlugin",
                    action = "Index",
                    id = UrlParameter.Optional
                },
                new
                {
                    controller = "ContentLanguagePlugin"
                });

        }

I added EPiServer resources in <head> for EPiServer CSS feeling to it:
(_Layout.cshtml file)

@using EPiServer.Framework.Web.Resources
<!DOCTYPE html>

<html>
<head>
    <meta name="viewport" content="width=device-width" />
    <meta http-equiv="X-UA-Compatible" content="IE=Edge" />
    <title>Content Language Tool</title>

    <!-- Shell -->
    @Html.Raw(ClientResources.RenderResources("ShellCore"))
    @Html.Raw(ClientResources.RenderResources("ShellWidgets"))

    <!-- LightTheme -->
    @Html.Raw(ClientResources.RenderResources("ShellCoreLightTheme"))

    <!-- Navigation -->
    @Html.Raw(ClientResources.RenderResources("Navigation"))

    <!-- Dojo Dashboard -->
    @Html.Raw(ClientResources.RenderResources("DojoDashboardCompatibility", new[] { ClientResourceType.Style }))
    
    <style>
        a {
            color: blue !important;
        }
        a:hover {
            text-decoration: underline !important;
        }
    </style>
</head>

<body>
    <div class="epi-padding epi-contentArea">
        <div>
            @RenderBody()
        </div>

    </div>
</body>
</html>

Some info regarding the EPiServer CSS classes etc:
https://www.epinova.no/en/blog/creating-a-consistent-look-in-episerver-plugins/